Create Spark Job
info
- Follow the steps mentioned below.
- Total time taken for this task: 10 Minutes.
- Pre-requisites: Create ETL Output Datasets
Create a Spark Job to transform data
- Click on 'ETL' --> 'Jobs' from left navigation-bar.
- Click on ➕ icon at the top right corner to create a new job.
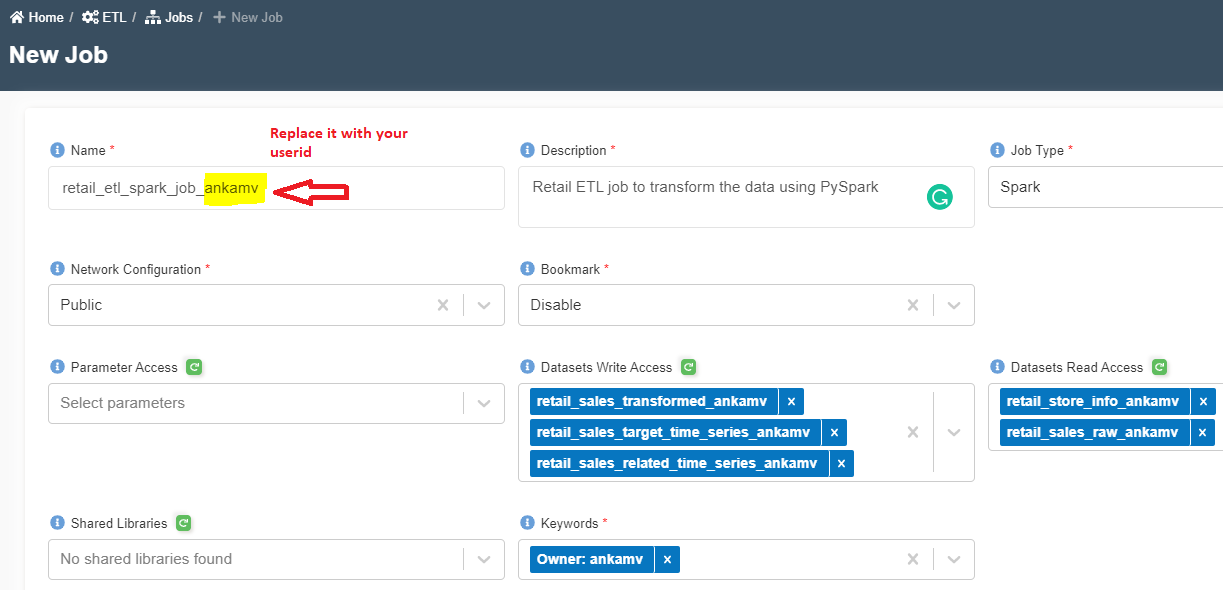
- Enter the following information.
Name: retail_etl_spark_job_<your_userid>
Description: Retail ETL job to transform the data using PySpark
Job Type: Spark
Network Configuration: Public
Bookmark: Disable
Parameter Access:
Datasets Write Access: retail_sales_transformed_<your_userid>, retail_sales_related_time_series_<your_userid>, retail_sales_target_time_series_<your_userid>
Datasets Read Access: retail_sales_raw_<your_userid>, retail_store_info_<your_userid>
Shared Libraries:
Keywords: Retail
Allocated Capacity: 2
Max Concurrent Runs, Max Retries, Timeout, Notify Delay After: Leave them as is (A default value will be assigned)
Glue Version: 2.0
Python Version: 3
Job Parameters:
- Click on 'Submit' at the bottom. You will get a message as shown below.
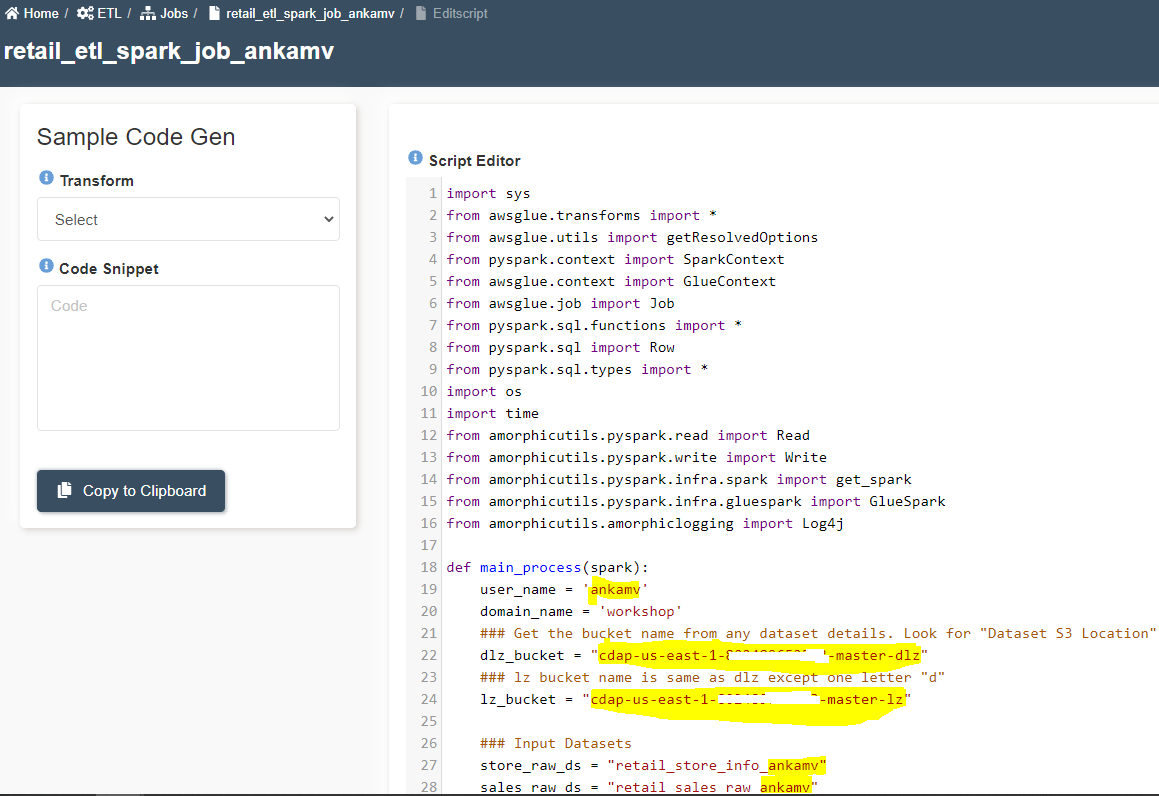
- A new script editor window with a default code will appear.
- Toggle the 'Read mode on' button to get into edit mode.
- Delete the existing code. Copy and paste the following code block.
import sys
from awsglue.transforms import *
from awsglue.utils import getResolvedOptions
from pyspark.context import SparkContext
from awsglue.context import GlueContext
from awsglue.job import Job
from pyspark.sql.functions import *
from pyspark.sql import Row
from pyspark.sql.types import *
import os
import time
from amorphicutils.pyspark.read import Read
from amorphicutils.pyspark.write import Write
from amorphicutils.pyspark.infra.spark import get_spark
from amorphicutils.pyspark.infra.gluespark import GlueSpark
from amorphicutils.amorphiclogging import Log4j

def main_process(spark):

    ### ::: Replace all 'ankamv' with your userid :::
    user_name = 'ankamv'
    domain_name = 'workshop'
    ### Get the bucket name from any dataset details. Look for "Dataset S3 Location". Replace it here.
    dlz_bucket = "xxxx-us-east-1-xxxxxxxxxxxx-master-dlz"
    ### lz bucket name is same as dlz except one letter "d"
    lz_bucket = "xxxx-us-east-1-xxxxxxxxxxxx-master-lz"

    ### Input Datasets.
    store_raw_ds = "retail_store_info_ankamv"
    sales_raw_ds = "retail_sales_raw_ankamv"

    ### Output Datasets
    sales_transformed_ds = "retail_sales_transformed_ankamv"
    sales_related_ds = "retail_sales_related_time_series_ankamv"
    sales_target_ds = "retail_sales_target_time_series_ankamv"

    ##Create Schemas
    store_info_schema=StructType([
          StructField('Store_No',IntegerType(),True),
          StructField('Store_Address',StringType(),True),
          StructField('Region',StringType(),True)
    ])

    sales_schema=StructType([
          StructField('Month_Id',StringType(),True),
          StructField('Location',StringType(),True),
          StructField('Store_No',IntegerType(),True),
          StructField('Store_Name',StringType(),True),
          StructField('food_or_non_food',StringType(),True),
          StructField('Division',StringType(),True),
          StructField('Main_Category_No',IntegerType(),True),
          StructField('Main_Category_Name',StringType(),True),
          StructField('Sales_in_NSP',DoubleType(),True),
          StructField('COGS_in_NNBP',DoubleType(),True),
          StructField('Gross_Profit',DoubleType(),True),
          StructField('Gross_Profit_pct',StringType(),True)
    ])

    print("reading data")
    _csv_reader = Read(dlz_bucket, spark)
    source_response = _csv_reader.read_csv_data(domain_name,store_raw_ds,header=False,schema=store_info_schema)
    store_df = source_response['data']
    #store_df.show(n=10,truncate=False)

    #Read and cleanse Sales data
    source_response = _csv_reader.read_csv_data(domain_name,sales_raw_ds,header=False,schema=sales_schema)
    sales_df = source_response['data']
    sales_df = sales_df.join(store_df,'Store_No')
    sales_df = sales_df.select(regexp_replace('Month_Id', '2012', '2018').alias('Month_Id1'), '*').drop('Month_Id')
    sales_df = sales_df.select(regexp_replace('Month_Id1', '2013', '2019').alias('Month_Id2'), '*').drop('Month_Id1')
    sales_df = sales_df.select(regexp_replace('Month_Id2', '2014', '2020').alias('Month_Id3'), '*').drop('Month_Id2')
    sales_df = sales_df.select(regexp_replace('Month_Id3', '2015', '2021').alias('Month_Id4'), '*').drop('Month_Id3')
    sales_df = sales_df.withColumnRenamed('Month_Id4', 'Month_Id')
    sales_df = sales_df.withColumn("timestamp", to_date('Month_Id', 'yyyyMM'))
    sales_df = sales_df.select(regexp_replace('Main_Category_Name', ' ', '_').alias('Main_Category_Name1'), '*').drop('Main_Category_Name')
    sales_df = sales_df.select(regexp_replace('Store_Name', ' ', '_').alias('Store_Name1'), '*').drop('Store_Name')
    sales_df = sales_df.withColumn('item_id', concat_ws('_', sales_df.Main_Category_Name1, sales_df.Store_Name1))
    sales_df = sales_df.select('Month_Id','Store_No','Store_Name1','Store_Address','Region','food_or_non_food','Division','Main_Category_No','Main_Category_Name1','Sales_in_NSP','COGS_in_NNBP','Gross_Profit','Gross_Profit_pct','timestamp', 'item_id')
    sales_df = sales_df.withColumnRenamed('Store_Name1', 'Store_Name') \
                       .withColumnRenamed('Main_Category_Name1', 'Main_Category_Name')

    #sales_df.show(n=10,truncate=False)

    # Create dataset for RELATED_TIME_SERIES. Used in prediction.
    sales_df_related = sales_df.select('Store_No','Store_Name', 'Region','food_or_non_food','Division','Main_Category_No','Main_Category_Name','COGS_in_NNBP','Gross_Profit_pct','timestamp', 'item_id')
    #sales_df_related.show(n=10,truncate=False)


    # Create dataset for TARGET_TIME_SERIES.  Used in prediction.
    sales_df_target = sales_df.select('Sales_in_NSP', 'timestamp', 'item_id')
    sales_df_target = sales_df_target.withColumnRenamed('Sales_in_NSP', 'demand')
    #sales_df_target.show(n=10,truncate=False)

    print("writing sales data")
    writer = Write(lz_bucket, spark)
    epoch = str(int(time.time()))
    response = writer.write_csv_data(sales_df.repartition(1), domain_name, sales_transformed_ds, user=user_name, file_type="csv", header=True, delimiter=",", quote=False, upload_date=epoch)

    if response['exitcode'] == 0:
       print("Successfully wrote sales data....")
    else:
       print("Error writing sales data.... : ", response['message'])
       sys.exit(response['message'])

    print("writing sales related data")
    epoch = str(int(time.time()))
    response = writer.write_csv_data(sales_df_related.repartition(1), domain_name, sales_related_ds, user=user_name, file_type="csv", header=True, delimiter=",", quote=False, upload_date=epoch)
    if response['exitcode'] == 0:
       print("Successfully wrote sales related data....")
    else:
       print("Error writing sales related data.... : ", response['message'])
       sys.exit(response['message'])

    print("writing sales target data")
    epoch = str(int(time.time()))
    response = writer.write_csv_data(sales_df_target.repartition(1), domain_name, sales_target_ds, user=user_name, file_type="csv", header=True, delimiter=",", quote=False, upload_date=epoch)
    if response['exitcode'] == 0:
       print("Successfully wrote sales target data....")
    else:
       print("Error writing sales target data.... : ", response['message'])
       sys.exit(response['message'])


if __name__ == "__main__":
    ## @params: [JOB_NAME]
    args = getResolvedOptions(sys.argv, ['JOB_NAME'])
    sc = SparkContext()
    glueContext = GlueContext(sc)
    spark = glueContext.spark_session
    job = Job(glueContext)
    job.init(args['JOB_NAME'], args)
    main_process(spark)
    job.commit()
- Replace all
ankamvwith youruserid. You can find your username by clicking 👤 icon at top right corner --> Right click onProfile & Settings-- > Click onopen link in new tab--> Click onView your Profile. - Replace
dlz_bucketandlz_bucketwith bucket name from your environment. You can find the bucket name fromretail_sales_transformed_<your_userid>dataset'sdetailstab. Look for "Dataset S3 Location". lz bucket name is same as dlz except one letter "d" - Click on 'Save & Publish' button to save the script.
- Download the following file to your computer.
Amorphicutils Library - Click here to download
- Click on 'Update External Libs' and select the downloaded amorphicutils.zip file and upload it. This will add an argument '--extra-py-files' to the job
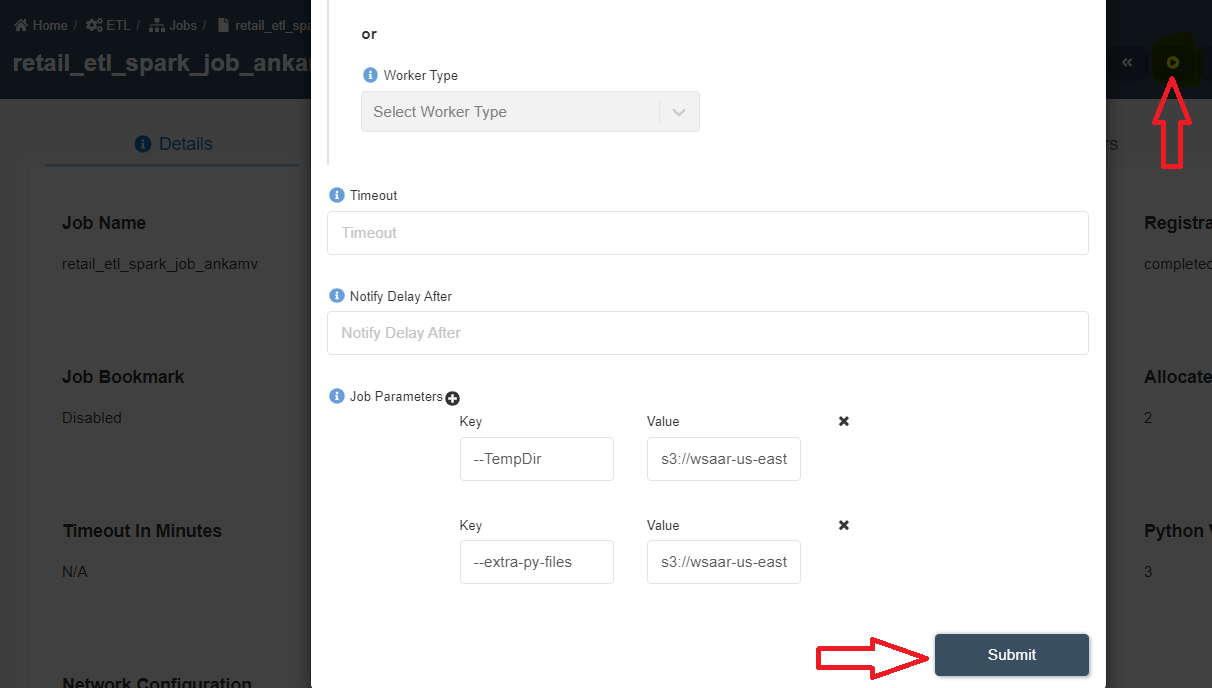
- Click on 'Run Job' ▶️ button at the top right corner.
- Click on 'Submit' on the popped-up window as shown below.
- Click on 'Executions' tab and click the 🔄 button to get the latest status of the job.
- Once the job is successfully finished, status will turn from 🟠 to ✔️
- You may check "Output" or "Error" logs by clicking on ⋮
three dotsin front of the finished job. - From the job details page, click on the output datsets to go to datasets page.
- Click on Files tab.
- Click 🔄 to refresh the status. It will take a few minutes to finish data validation.
Congratulations!!!
You have learned how to create and run a Spark job on Amorphic. Now, proceed to 'Create Morph Job' task.


