Create ETL Output Datasets
info
- Follow the steps mentioned below.
- Total time taken for this task: 10 Minutes.
- Pre-requisites: Ingest data into Amorphic
Types of ETL on Amorphic
| Types of ETL | Description | Skillset needed |
|---|---|---|
| 1. Using Spark job | Write Pyspark code | Experienced Pyspark Developer |
| 2. Using Morph job | Create a Drag and Drop Job | Any ETL developer / Business Analyst |
You may choose 1️⃣ or 2️⃣ depending on your skillset or you may try both.
For both methods, we need to create three 'Datasets' for forecasting and dashboarding. Best part of Amorphic is - these datasets will automatically write data to Redshift tables without any additional coding. So, let's create these Datasets.
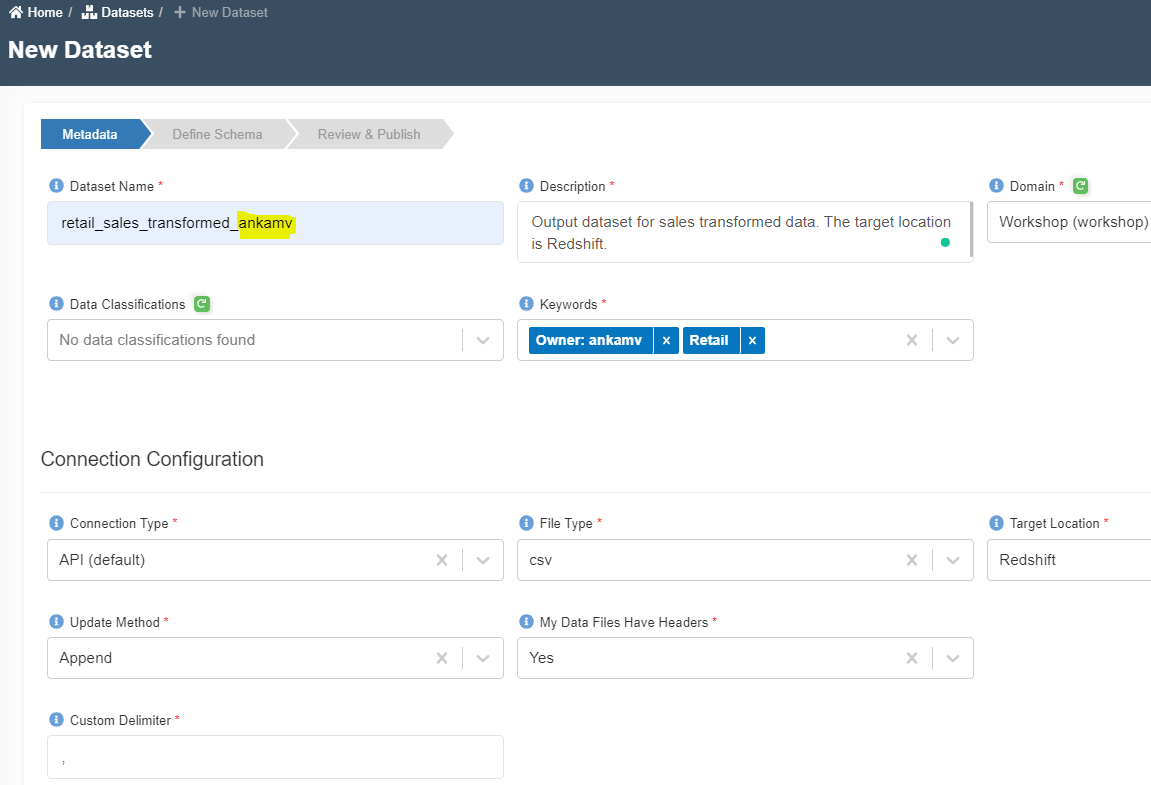
Create retail_sales_transformed_userid Dataset
- Click on 'DATASETS' --> 'Datasets' from left navigation-bar.
- Click on ➕ icon at the top right corner.
- Enter the following information
{
  "Dataset Name": "retail_sales_transformed_<your_userid>"
  "Description": "Output dataset for sales transformed data. The target location is Redshift."
  "Domain": "workshop(workshop)"
  "Data Classifications":
  "Keywords": "Retail"
  "Connection Type": "API (default)"
  "File Type": "csv"
  "Target Location": "Redshift"
  "Update Method": "Append"
   "My Data Files Have Headers": "Yes"
  "Custom Delimiter": ","
  "Enable Malware Detection": "No"
  "Enable Data Profiling": "No"
}
- Click on 'Register' button at the bottom to move to the next step.
- Click on the following CSV file to download it to your computer.
- Click on 'Click to upload' to upload the file that is downloaded in above step.
- Click on 'Extract Schema' as shown below.
- You will get a message 'File uploaded successfully'. Click OK.
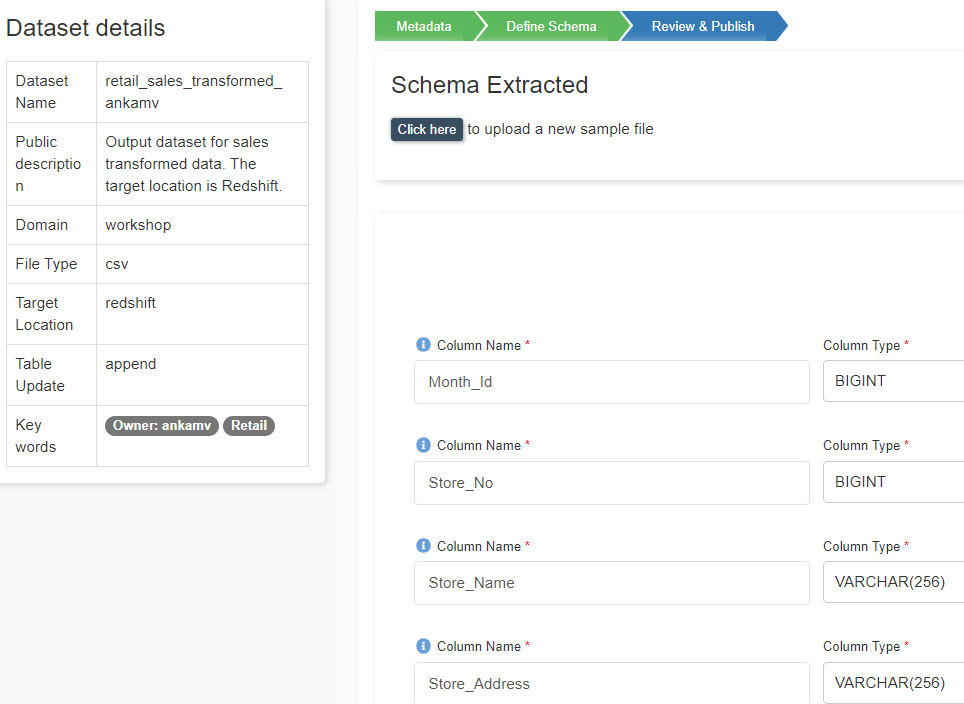
- A new screen will appear with the schema extracted as shown below.
- Verify the columns and data types.
- Change the 'Sort Key Type' to None.
- Click on 'Publish Dataset'. You will get 'Completed the registration process successfully' message. Click OK.
Create next two datasets just like the above one but destination as S3.
Create retail_sales_related_time_series_userid Dataset
{
  "Dataset Name": "retail_sales_related_time_series_<your_userid>"
  "Description": "Related time series dataset for predicting sales."
  "Domain": "workshop(workshop)"
  "Data Classifications":
  "Keywords": "Retail"
  "Connection Type": "API (default)"
  "File Type": "csv"
  "Target Location": "S3"
  "Update Method": "Append"
  "Enable Malware Detection": "No"
  "Enable Data Profiling": "No"
}
You don't need to upload any schema for S3 datasets.
Create retail_sales_target_time_series_userid Dataset
{
  "Dataset Name": "retail_sales_target_time_series_<your_userid>"
  "Description": "Target time series dataset for predicting sales."
    "Domain": "workshop(workshop)"
  "Data Classifications":
  "Keywords": "Retail"
  "Connection Type": "API (default)"
  "File Type": "csv"
  "Target Location": "S3"
  "Update Method": "Append"
  "Enable Malware Detection": "No"
  "Enable Data Profiling": "No"
}
Congratulations!!!
You have learned how to create Amorphic datasets. Now, proceed to 'Create Spark Job' task.


