Create Morph Job
info
- Follow the steps mentioned below.
- Total time taken for this task: 30 Minutes.
- Pre-requisites: Create ETL Output Datasets
Delete files
- If you've already created and ran a Spark job, you must delete ETL files or datasets. If you haven't ran Spark job, skip this section.
- Go to
Filespage ofretail_sales_related_time_series_<your_userid>dataset, Click on 🗑️Delete all files permanantly. Click onAcknowledge & Continue - Go to
Filespage ofretail_sales_target_time_series_<your_userid>dataset, Click on 🗑️Delete all files permanantly. Click onAcknowledge & Continue - Go to
retail_etl_spark_job_<your_userid>job page. Click on ✏️ to removeretail_sales_transformed_<your_userid>dataset from outputs. Click on Update. This is to remove dependency before deleting it. - Go to
retail_sales_transformed_<your_userid>dataset page, click on 🗑️Delete Dataseticon. ClickYeswhen asked for "Are you sure you want to delete this dataset permanently ?". - Follow the same procedure on Create ETL Output Datasets to create
retail_sales_transformed_<your_userid>dataset.
Create a Morph Job
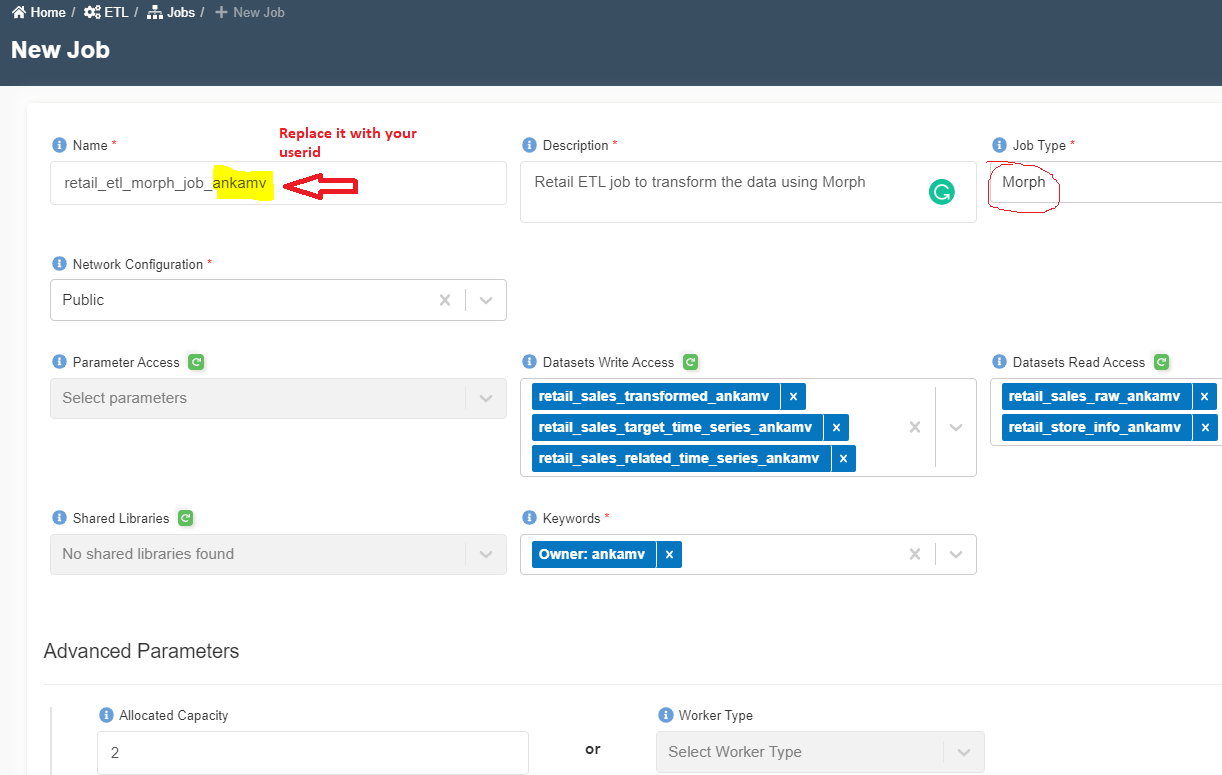
- Click on 'ETL' --> 'Jobs' from left side navigation-bar.
- Click on ➕ icon at the top right corner to create a new job.
- Enter the following information.
Name: retail_etl_morph_job_<your_userid>
Description: Retail ETL job to transform the data using Morph
Job Type: Morph
Network Configuration: Public
Bookmark: Disable
Parameter Access:
Datasets Write Access: retail_sales_transformed_<your_userid>, retail_sales_related_time_series_<your_userid>, retail_sales_target_time_series_<your_userid>
Datasets Read Access: retail_sales_raw_<your_userid>, retail_store_info_<your_userid>
Shared Libraries:
Keywords: Retail
Allocated Capacity: 2
Max Concurrent Runs, Max Retries, Timeout, Notify Delay After: Leave them as is (A default value will be assigned)
Glue Version: Disabled
- Click on 'Submit' at the bottom. You will get a message as shown below. Click OK.
- You will be routed to Morph edit script. If you see the login page of Amorphic, click the ⏪ icon at the top right corner and the click on
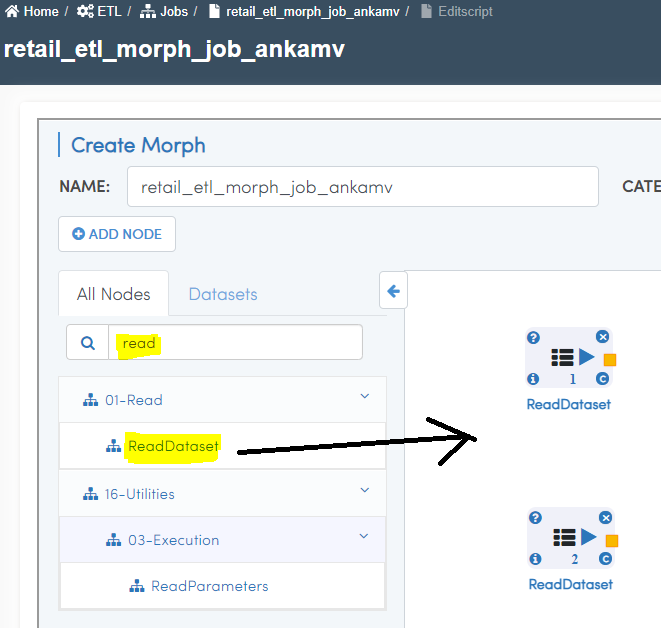
Edit Morph Scripticon. - Search for
read. Drag twoReadDatasetnodes as shown below.
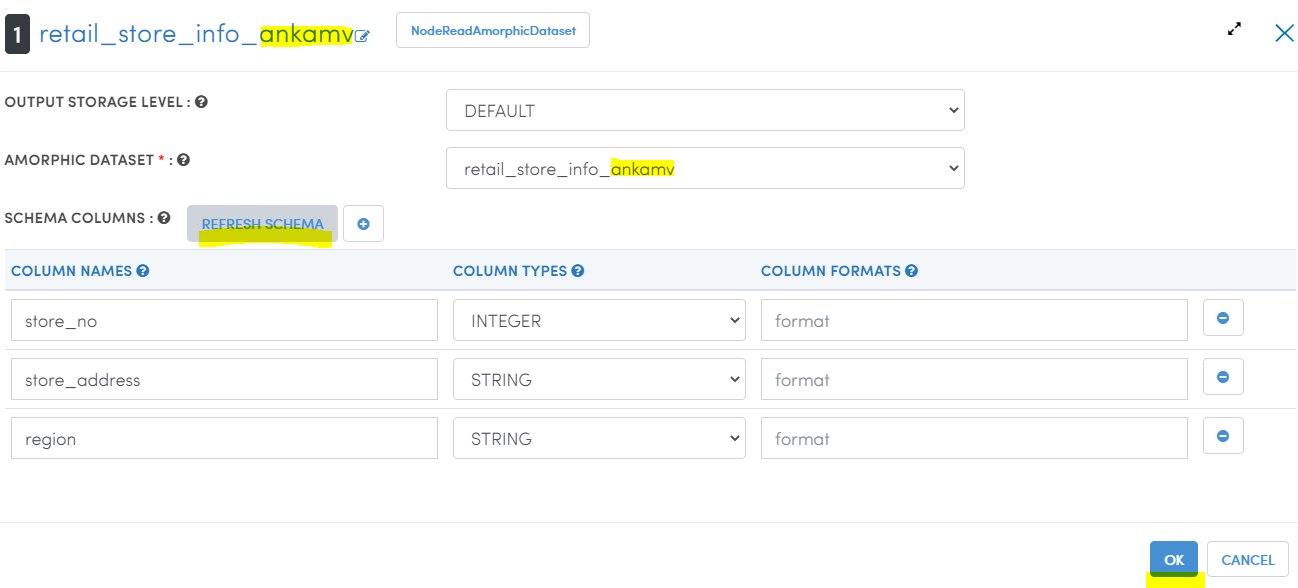
- Double click on the hamburger icon of the first
ReadDatasetnode. - Wait for a pop-up window. Select the Amorphic Dataset as
retail_store_info_<your_userid>. - Click on 'REFRESH SCHEMA'. Wait for orange colored progress bar to finish at the top. Once the schema is refreshed, click OK as shown below.
- Double click on the hamburger icon of the second
ReadDatasetnode. - Select
retail_sales_raw_<your_userid>as Amorphic dataset. - Click on 'REFRESH SCHEMA' and click OK.
- Click on ▶️ icon to fetch sample data.
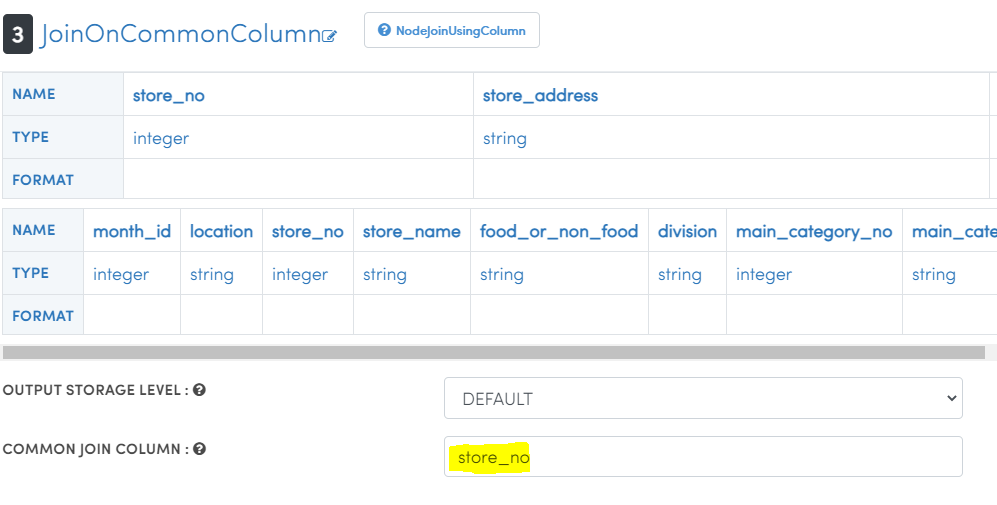
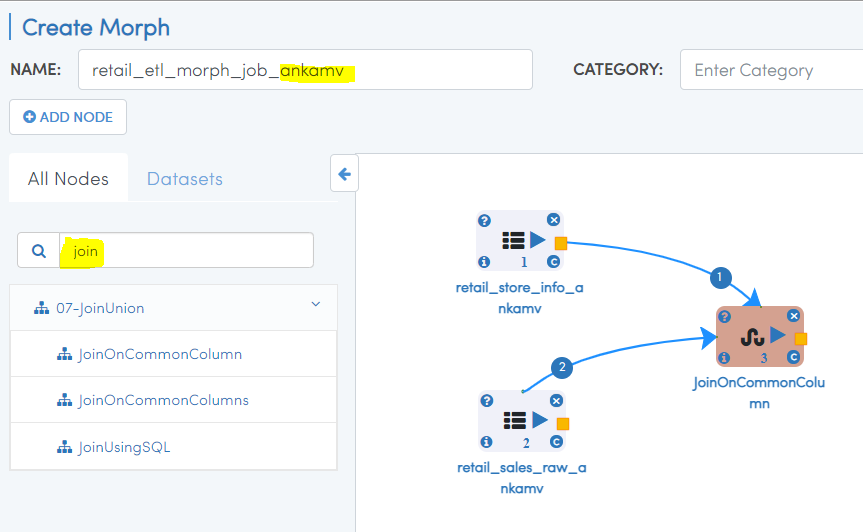
- Type 'join' in search nodes box and drag 'JoinOnCommonColumn' node.
- Join two Dataset nodes to 'JoinOnCommonColumn' node using a 🟨 icon.
- Double click on 'JoinOnCommonColumn' node, type COMMON JOIN COLUMN as 'store_no'. Click OK. Check screenshots below.
- Click ▶️ icon to see joined data. Ignore if you get any error.
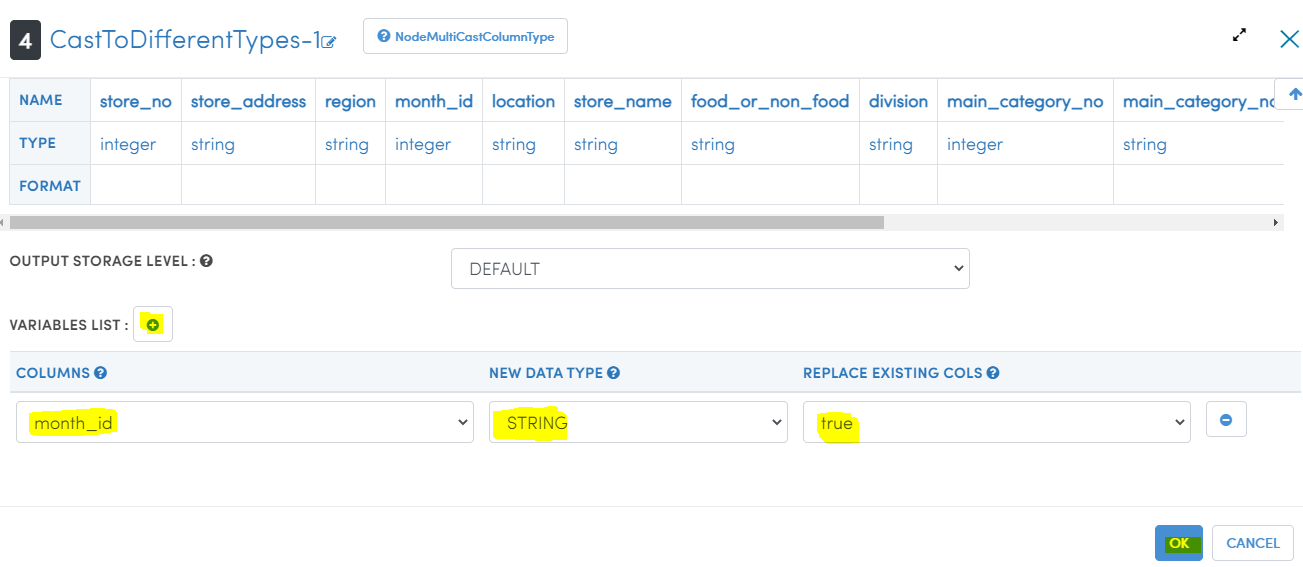
- Type 'cast' in search nodes box and drag 'CastToDifferentTypes-1' node.
- Join 'JoinOnCommonColumn' node with 'CastToDifferentTypes-1' node using 🟨 icon.
- Double click on ⓣ icon.
- Click on 'VARIABLES LIST' ➕ icon. Select "month_id", pick new data type as 'string'. Set replace existing cols as 'true'. Check screenshots below.
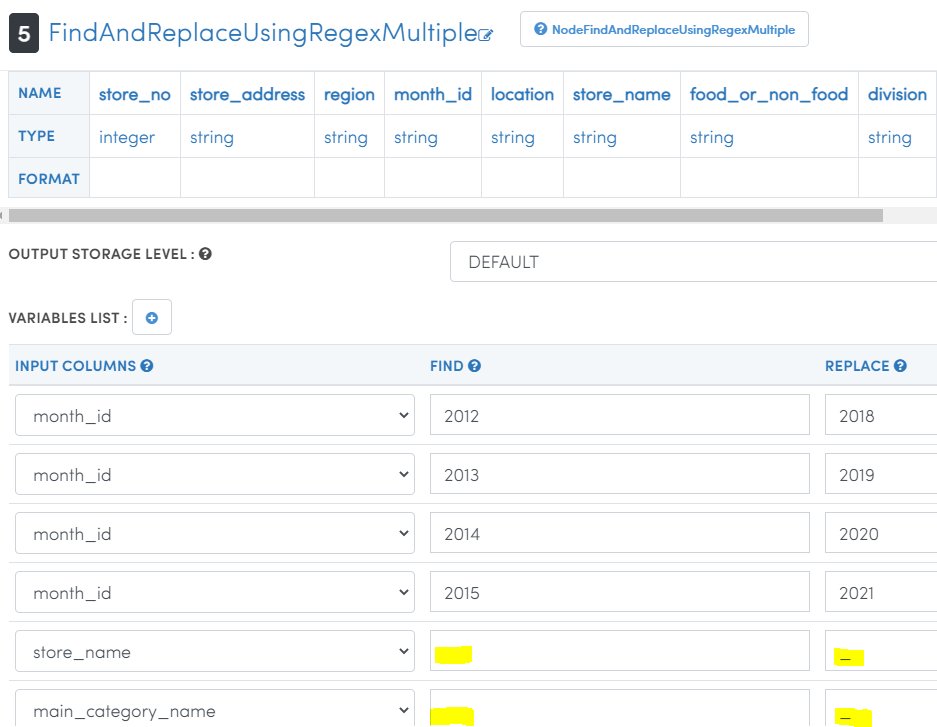
- Type 'RegexMultiple' in search nodes box and drag 'FindAndReplaceUsingRegexMultiple' node.
- Join 'CastToDifferentTypes-1' node with 'FindAndReplaceUsingRegexMultiple' node using 🟨 icon.
- Double click on ⓣ icon.
- Click on 'VARIABLES LIST' ➕ icon. Select 'month_id' four times to changes values as shown below.
- Select 'store__name' and 'main_category_name' to replace
spacewithunderscoreNote that there are no quotes for space or underscore. Check the screenshot below.
- Type 'table' in search nodes box and drag 'RegisterTempTable' node.
- Join 'FindAndReplaceUsingRegexMultiple' node with 'RegisterTempTable' node using 🟨 icon.
- Double click on ⓣ icon.
- Type table name as 'sales' as shown below.
- Type 'sql' in search nodes box and drag 'SQL' node.
- Join 'RegisterTempTable' node with 'SQL' node using 🟨 icon.
- Double click on ⓣ icon.
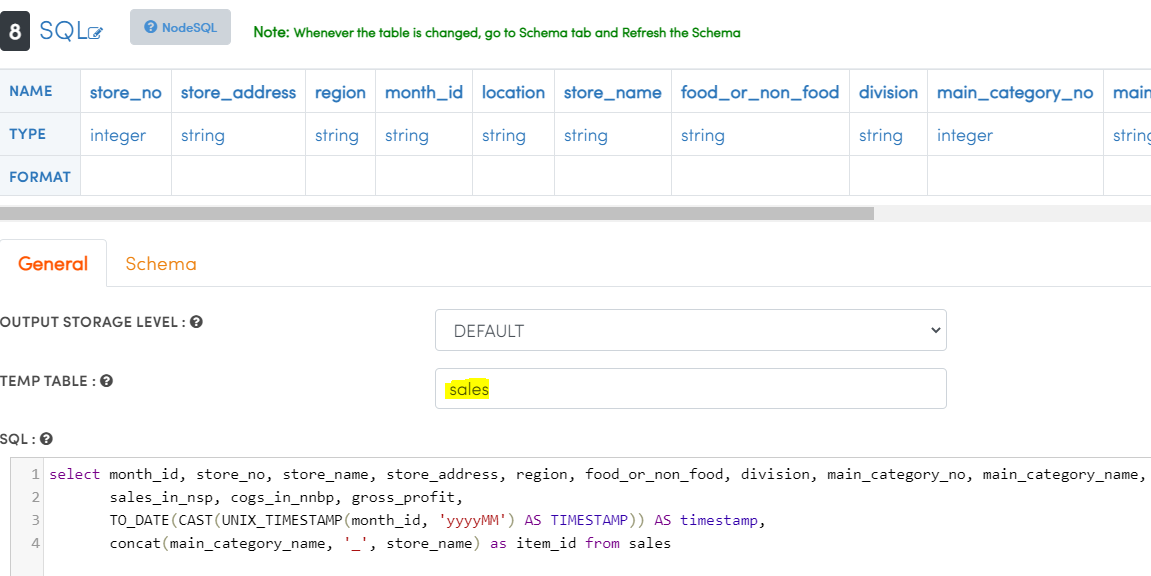
- Type temp table name as
sales. - Copy and paste sql as shown below.
select month_id, store_no, store_name, store_address, region, food_or_non_food, division, main_category_no, main_category_name,
       sales_in_nsp, cogs_in_nnbp, gross_profit, gross_profit_pct,
       TO_DATE(CAST(UNIX_TIMESTAMP(month_id, 'yyyyMM') AS TIMESTAMP)) AS timestamp,
       concat(main_category_name, '_', store_name) as item_id from sales
- Click on
Schematab and click onRefresh Schema. Wait forSchema Refreshedmessage to appear.
- Type 'save' in the search nodes box and drag 'SaveDataset' node.
- Join 'SQL' node with 'SaveDataset' node using 🟨 icon.
- Double click on ⓣ icon.
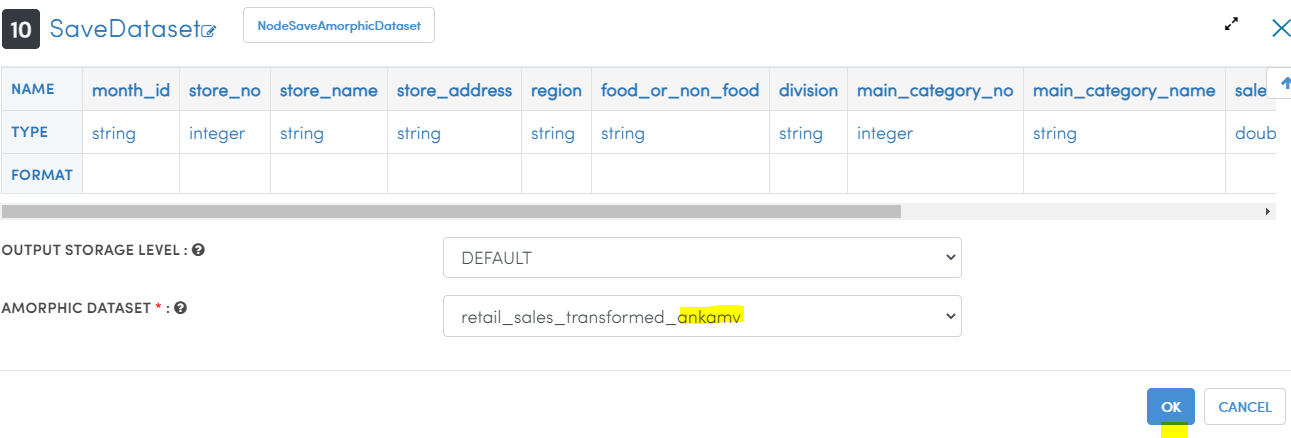
- Select Amorphic Dataset as
retail_sales_transformed_<your_userid>as shown below.
- Add two more
SQLandSaveDatasetnodes and connect them toRegisterTempTablenode. - Use the following SQLs and Amorphic Dataset name and table name accordingly.
select store_no, store_name, region, food_or_non_food, division, main_category_no, main_category_name,
       cogs_in_nnbp, gross_profit_pct,
       TO_DATE(CAST(UNIX_TIMESTAMP(month_id, 'yyyyMM') AS TIMESTAMP)) AS timestamp,
       concat(main_category_name, '_', store_name) as item_id from sales

Temp table: sales
Amorhic Dataset Name:  retail_sales_related_time_series_<your_userid>
select sales_in_nsp as demand,
       TO_DATE(CAST(UNIX_TIMESTAMP(month_id, 'yyyyMM') AS TIMESTAMP)) AS timestamp,
       concat(main_category_name, '_', store_name) as item_id from sales

Temp table: sales
Amorhic Dataset Name:  retail_sales_target_time_series_<your_userid>
Note: Don't forget to click on
Schematab of "SQL nodes" and click onRefresh Schema. Wait forSchema Refreshedmessage to appear.Click on
SAVEbutton to save the workflow. Click onBack⏪ icon to go to job's page.Click on 'Run Job' ▶️ button at the top right corner.
Click on 'Submit' on the popped-up window.
Click on 'Executions' tab and click the 🔄 button to get the latest status of the job.
Once the job is successfully finished, status will turn from 🟠 to ✔️
You may check "Output" or "Error" logs by clicking on ⋮
three dotsin front of the finished job.
- From the job details page, click on the output datasets to go to the datasets page.
- Click on
Filestab. - Click 🔄 to refresh the status. It will take a few minutes to finish data validation.
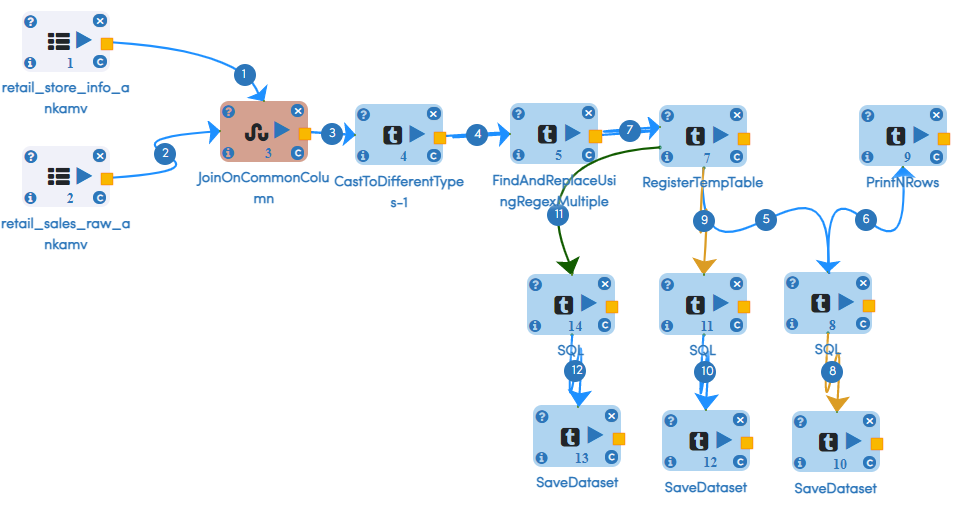
- Final Morph job flow looks like this...
Congratulations!!!
You have learned how to use drag and drop ETL on Amorphic. Now, proceed to 'Query Data' or 'Forecasting Sales' task.

