Create and run a Morph job to join two mobile banking datasets
info
- Prerequisite: Ingestion task
Create Output Dataset
- Click on 'DATASETS' --> 'Datasets' from left navigation-bar.
- Click on ➕ icon at the top right corner.
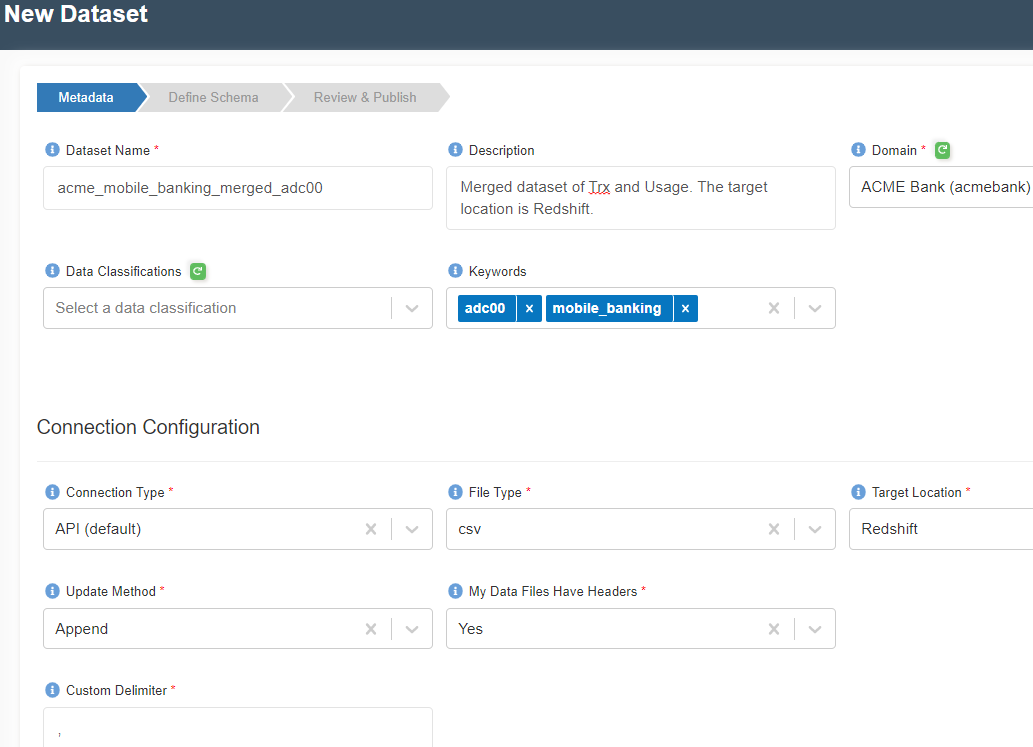
- Enter the following information
{
  "Dataset Name": "acme_mobile_banking_merged_<your-userid>"
  "Description": "Merged dataset of Trx and Usage. The target location is Redshift."
  "Domain": "ACME Bank (acmebank)"
  "Data Classifications":
  "Keywords": "mobile_banking"
  "Connection Type": "API (default)"
  "File Type": "csv"
  "Target Location": "Redshift"
  "Update Method": "Append"
   "My Data Files Have Headers": "Yes"
  "Custom Delimiter": ","
  "Enable Malware Detection": "No"
  "Enable Data Profiling": "No"
  "Enable Life Cycle Policy": "No"
}
- Click on 'Register' button at the bottom to move to the next step.
- Click on the following JSON file to download it to your computer.
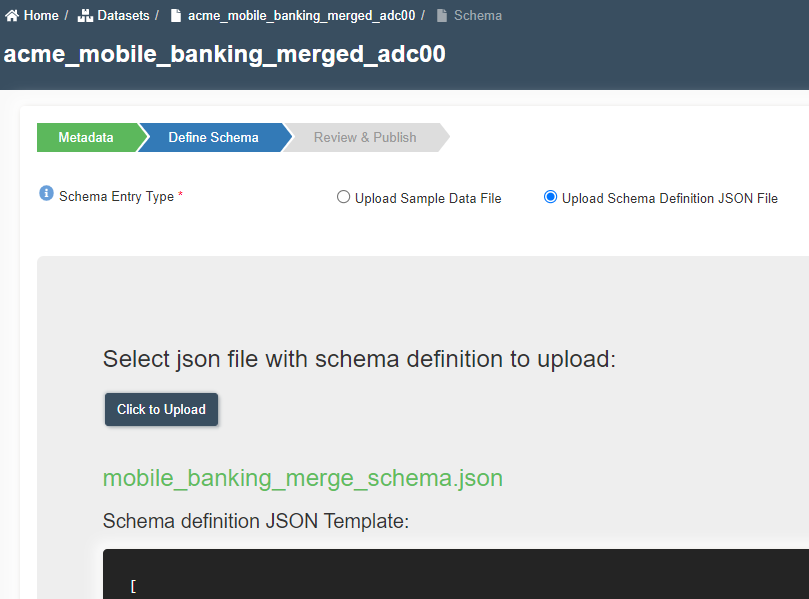
- Click on Upload Schema Definition JSON File.
- Click on 'Click to upload' to upload the JSON Schema.
- Click on 'Extract Schema' as shown below.
- A new screen will appear with the schema extracted as shown below.
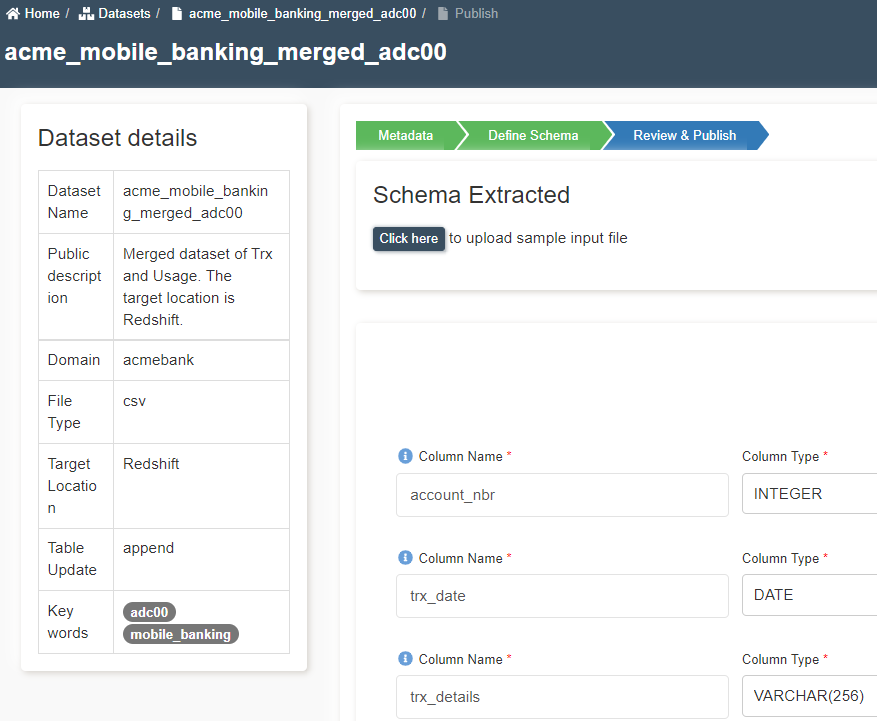
- Verify the columns and data types.
- Change the 'Sort Key Type' to None.
- Click on 'Publish Dataset'. You will get 'Completed the registration process successfully' message. Click OK.
Create a Morph Job
- Click on 'ETL' --> 'Jobs' from left side navigation-bar.
- Click on ➕ icon at the top right corner to create a new job.
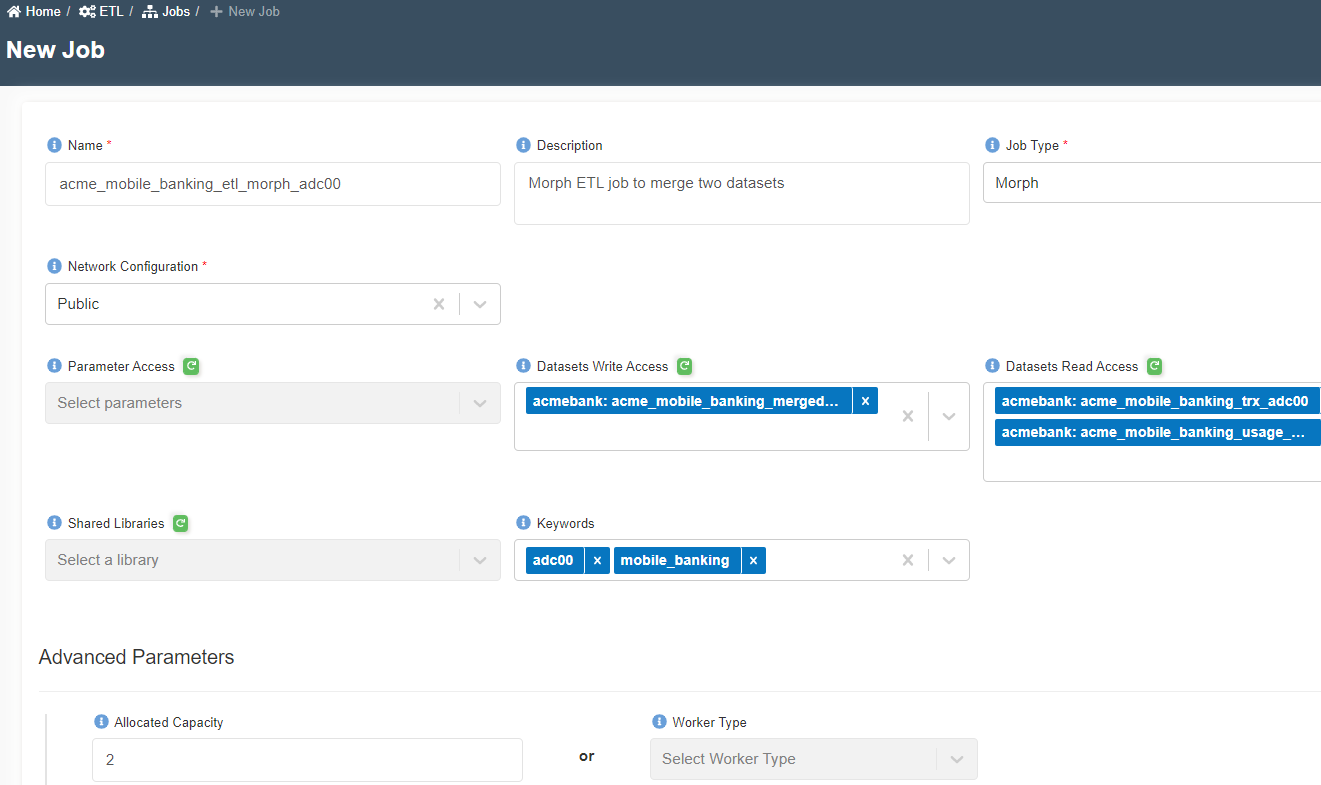
- Enter the following information.
Name: acme_mobile_banking_etl_morph_<your-userid>
Description: Morph ETL job to merge two datasets
Job Type: Morph
Network Configuration: Public
Parameter Access:
Datasets Write Access: acmebank:acme_mobile_banking_merged_<your-userid>
Datasets Read Access: acmebank:acme_mobile_banking_trx_<your-userid>, acmebank:acme_mobile_banking_usage_<your-userid>
Shared Libraries:
Keywords: mobile_banking
Allocated Capacity: 2
Max Concurrent Runs, Max Retries, Timeout, Notify Delay After: Leave them as is (A default value will be assigned)
Glue Version: Disabled
- Click on 'Submit' at the bottom. You will get a message as shown below. Click OK.
- You will be routed to Morph edit script. If you see the login page of Amorphic, click the ⏪ icon at the top right corner and the click on
Edit Morph Scripticon. - Search for
read. Drag twoReadDatasetnodes as shown below.
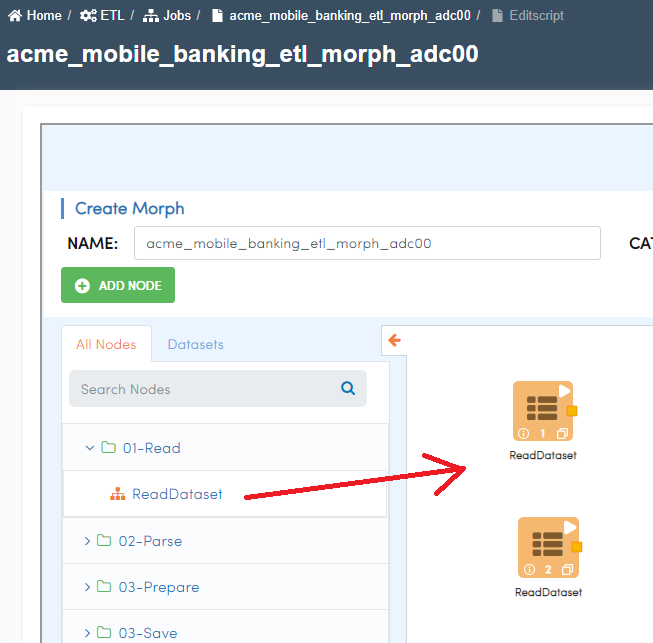
- Double click on the hamburger icon of the first
ReadDatasetnode. - Wait for a pop-up window. Select the Amorphic Dataset as
acme_mobile_banking_trx_<your-userid>. - Click on 'REFRESH SCHEMA'. Wait for orange colored progress bar to finish at the top. Once the schema is refreshed, click OK as shown below.
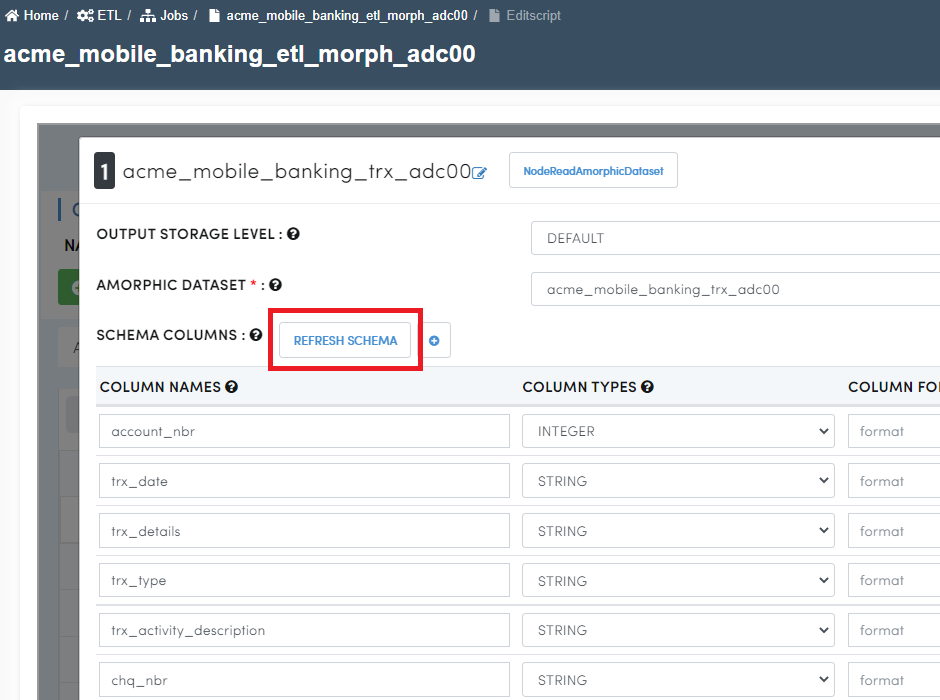
- Double click on the hamburger icon of the second
ReadDatasetnode. - Select
acme_mobile_banking_usage_<your_userid>as Amorphic dataset. - Click on 'REFRESH SCHEMA' and click OK.
- Click on ▶️ icon on any read node to fetch sample data.
- Type 'join' in search nodes box and drag 'JoinOnCommonColumn' node.
- Join two Read nodes to 'JoinOnCommonColumn' node by dragging and connecting 🟨 icons.
- Double click on 'JoinOnCommonColumn' node, type COMMON JOIN COLUMN as 'store_no'. Click OK. Check screenshots below.
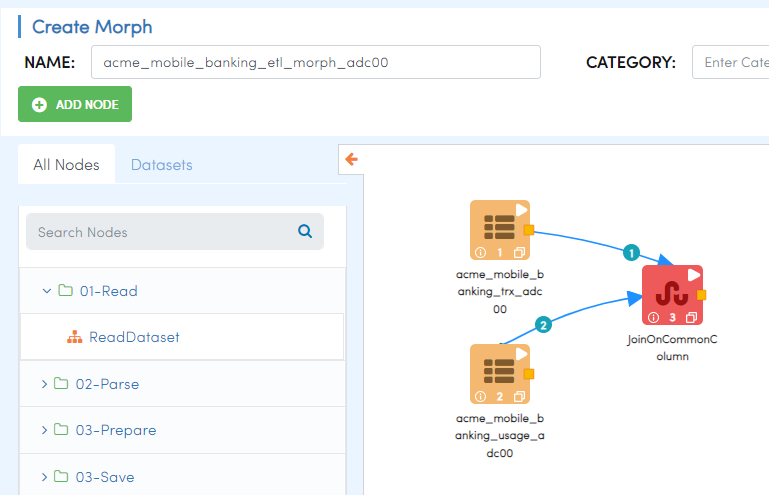
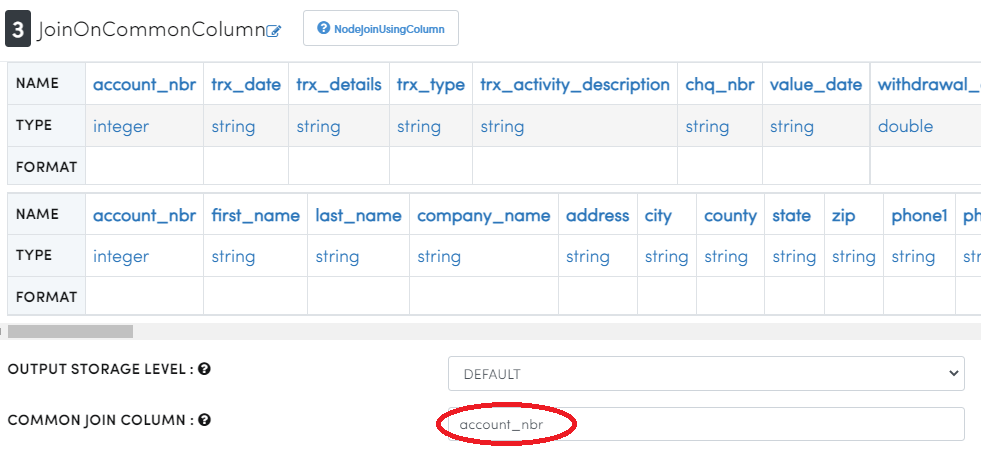
- Click ▶️ icon to see joined data.
- Type 'save' in search nodes box and drag 'SaveDataset' node.
- Connect 'JoinOnCommonColumn' and 'SaveDataset' nodes.
- Double click on 'SaveDataset' node.
- Choose Amorphic Dataset as
acme_mobile_banking_merged_<your_userid>. - Click OK.
- Final Morph job flow looks like this...
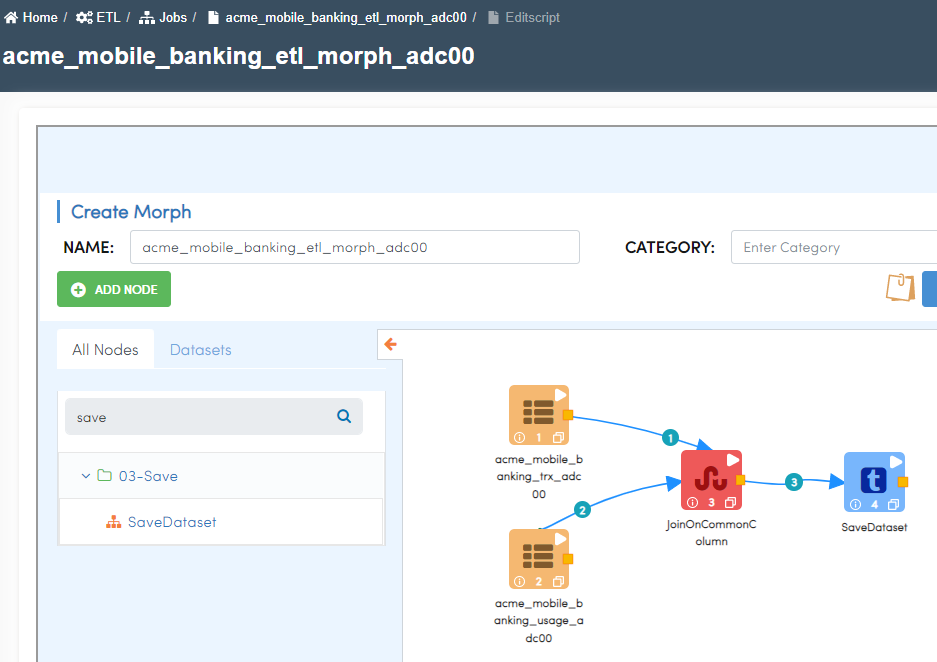
- Click on
SAVEbutton to save the workflow. Click onBack⏪ icon to go back to jobs page. - Click on 'Run Job' ▶️ button at the top right corner.
- Click on 'Submit' on the popped-up window.
- Click on 'Executions' tab and click the 🔁 icon to get the latest status of the job.
- Once the job is successfully finished, status will turn from 🟠 to ✔️
- You may check "Output" or "Error" logs by clicking on ⋮
three dotsin front of the finished job.
- From the job's details tab, click on the output dataset to go to the datasets page.
- Click on
Filestab. - Click 🔁 to refresh the status. It will take a few minutes to finish data validation.
Congratulations!!!
You have learned how to use drag and drop ETL on Amorphic. Now, proceed to 'Query Data' task.
